How To Make A Teddy Bear Tutorial
Today I’m going to show you how to make a stuffed bear using the bear kits that Wendy sells on her website shiny happy world. These are really easy to do and you can make one in less than an hour.
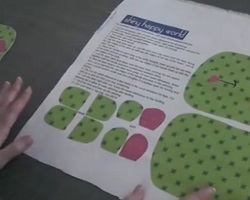
When you get your kit in the mail this is what’s going to look like. It’s got all the pieces that you need printed right on the fabric it also has some really simple instructions printed on the fabric you’ll see here that it’s really easy to do, so the first thing you going to do is basically just cut out around all these pieces and your just going to cut out right on the edge of the color where the color meets the white and so you have all the pieces cut out I’m not going to do that here because that would be boring.
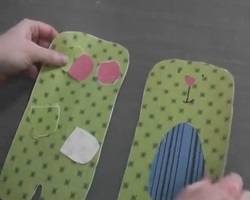
We have all the pieces cut-out here so you can see so we have a bear front and a bare back and then we’ve also got pieces for the hands to a beach shape and pieces for the ear and the ears have pink fronts and green backs to match the rest of the bear. Once you have all those pieces cut out I’m going to show you first we’re going to put together the hands. You have your two pieces that match you just want to put them right sides together. You can paint if you want to but for something this small I don’t even usually bother. we’re going to take it over to the sewing machine and with a quarter inch seam allowance, we’re going to sew just around that U. We’re going to leave this top part open so that we can turn that hand right side out.
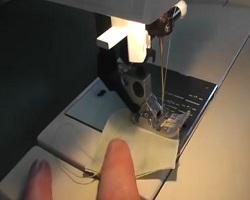
Next we’re going to go over to the sewing machine and I’ll show you how to do that. We’re going to sew this using a quarter-inch seam allowance that is the edge of the fabric lined up right with the edge of the presser foot. I have a whole video just showing you how to sew curves on sewing machine if you’ve never done that before or if you’re at all nervous about it. What we’re going to do here’s just lower the pressure foot. Back stitch it for a couple of stitches, then stitch forward. We’re just going to stitch right around that curve. Go slow where it curves. If you feel like it’s getting ahead of you, I like to lower the presser foot, lower the needle down into the presser foot, lift this up and do a little bit of turning myself just to get caught up to it. That’s a trick that also helps kids a lot they immediately get how useful that is and it’s something that they’re completely capable of doing so if they seem to be having a little trouble keeping up with that curve that’s a nice trick to teach them. You’re going to go all the way around that U. Backstitch again at the end and take it out of the machine you want to snip off those tail ends.
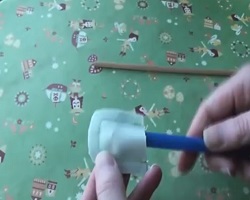
Next step is to go on over to the ironing board and I’m going to show you how we turn that right side out and press it flat. Okay to turn something right side out that I can’t really easily get my fingers into, this I could do but the ears are going to be smaller so I’m going to show you a nifty tool that I use a lot. These are turning tubes; you got a tube and a stick. You put your tube into the shape that you’re trying to turn, you put the rounded edge of the stick down on the top there and then that gives you a little anchor and you can turn right side out over the stick, then just use the stick to smooth out all those curves there. Get it nice and smooth and then you want to press that flat with some steam from the iron to get it nice and flat. so now I’ve got one hand done I need to go over and sew the other hand and both of the ears I’m not going to show you that coz it’s exactly the same process is this one, sew it around the U, turn it, press it flat.
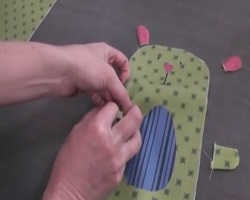
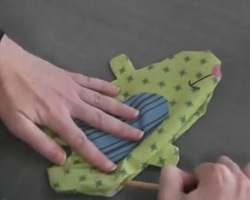
Okay now we have both of the hands and both the ears sewn turned and pressed and now I just need to pin them to the Bears front so you’re going to place the bear front face up so that you can see what’s what and you want to position these hands in the top third of the belly. It’s not very important where you put them, there’s no right or wrong place and whatever you do is going to look cute but I usually tend to put him in that top third. Pin those in place so they don’t shift around while you’re sewing. Same thing with the ears, you’re going to pin those, pink side down and I put them up in the corners of the head. Again the placement isn’t critical but you don’t want to put them on the middle of the head, which would look dorky. Just put them off toward the corners and pin those in place, now you’re almost ready. You’re going to take that back at the bear and you’re going to put it face-down over the front of the bear and line that up. I like to do the lineup point that the points that most easily lineup I like to pin those first. So do the U in-between his legs.
I’m going to do the top corners because those line up easily. Then I do the outside corners at his feet. The other thing that you need to think about is where you want to leave this open for stuffing and I like to leave a flat area opened for stuffing if I can to choose a flat area not a curved area so I’m gonna leave the area right below his arm this is where I’m going to start my stuffing opening and I’m gonna go down to right about where the curve of his foot starts. I’m going to put those pins there to remind me to start and stop that’s going to be my starting opening I’m going to put one more pain up here and just a couple pins on the side so that it holds them all together while I’m sewing.
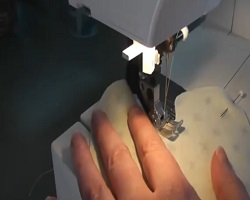
Now I’m going to take this over to the sewing machine and I’m going to start sewing here at the bottom of the stuffing opening in a backstitch with a quarter of an inch seam allowance I’m going to sew all the way around the bear and I’m gonna stop at this pin Okay so I’m going to start sewing right down there my first pin gonna backstitch a couple of stitches I’m going to start sewing around the bottom of his foot and I do all of this with a quarter of an inch seam allowance so I’m keeping this edge of the fabric lined up with that edge of the presser foot. When I go around the turns, I’m just going to use my hands a little bit and pull the pins out as they get in the way. This is probably the trickiest bit of sewing here is this tight curve around the top part of where his legs come together. Don’t sew over your pins as you can break a needle that way. I always slow down when I go over the hands right now I’m sewing over the hand catching that in the seam allowance and slow down again over the ear. Then I go over the last hand making sure I go a little bit past that hand making sure it’s really securely attached. Then I backstitch just before the opening. Then I take that over to the cutting table I’m gonna show you need to do some clipping of this curve in here.
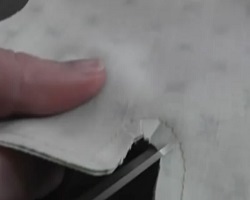
Okay we’ve got this little curve here anytime that you have a concave curve that’s a curve that goes in, you need to clip that right up to the threads of your stitching. You wanna be really careful not to clip your actual stitching lines but you want to go right up to it so I just snipped into that curve right up to the line of stitching but not into it, you don’t want to cut that stitching or you will have a hole in your softy. You just want to cut it a few times right in the tight part of the curve and then that’s the only inside curve so the next step is to turn it right side out. For this we don’t need any tools because the opening is big enough to get to it, and then I do like to use a stick just to help you get everything pressed out smoothly and right into all this little points.
Next step you’re going to take it over to the ironing board but you don’t want to press the whole thing flat we are gonna press the opening flat just to make it much easier to sew up after you’re done stuffing him. It’s going to give you some guidelines there. So this is easy, you just going to kind of let it turn in on itself, press it so that it’s smooth so that you get a continuous line and just get a little bit of steam and what that’s going to do is that when you’re ready to sew it closed those crease marks are going to give you are really nice guidelines to follow.
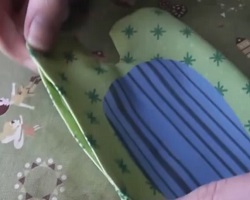
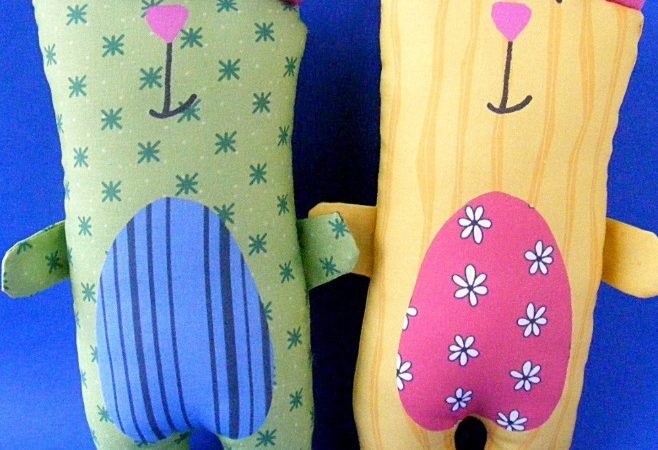
Now it’s time to stuff. It’s pretty simple the main thing to remember is don’t be skimpy you want your stuffing to be really smooth all the way around you don’t want his legs to be floppy. You want him to be about the same texture of a marshmallow so shoot for that when you’re stuffing. There are two different ways to sew up the stuffing opening there’s a whipstitch which I didn’t use here. A whipstitch is a little bit more visible but it’s the easier way to sew up the stuffing opening this is the more invisible way it takes a little bit more skill but it’s still not too difficult to do I do with kids and this is called the ladder stitch witch is just about invisible. That’s how you sew up the opening and that’s it so that’s it it’s really really easy to make a stuffed bear with one of these kits.
If you want to use your own fabric for it I also have a pattern for the exact same bear but you’re going to have to do some embroidery to do his face and you’re going to have to do some appliqué to give that contrast in color on his belly but it’s also really easy but it takes a little more than an hour this one takes less than an hour.


